May 25, 2010

Update Newest µTorrent 2.0.2 build 19648 on 15 May 2010

Since the last update µTorrent 201 build 19248 on 24 April 2010, I had tried so much this bittorrent client and found that the connection for download is rather slower than previous version. So when the torrent released the newest update µTorrent 202 build 19648 on 14 May 2010, I had installed it and found that the connection speed is faster than the prior release. If you did not updated your µTorrent client yet, then you have to update your utorrent client soon. µTorrent is a very tiny bittorrent client. Newest file size just 315 kb.
You can download µTorrent 202b19648 here. Apparently there are many Windows 7 users currently.

movies
5 Latest µTorrent History update changes :
Changes for v2.0.1 build 19248 -> v2.0.2 build 19648
~Change: disable net.calc_overhead by default to improve speeds for users with low caps
~Change: Sharper help graphic
~Fix: fixed crash while adding torrents - if more than 100 are added concurrently it will be done silently

v2.0.1 build 19248
~Change: bypass Windows system cache while reading to avoid excessive memory usage
~Fix: invalid header response on WebUI when an expired token or invalid request was sent
~Fix: fixed crash when adding many torrents at once (above 350 they will be added silently)

v2.0.1 build 19078
~uTP performance and TCP rate control have been greatly improved!
~BEP22 has been fixed
~Access denied problems should be virtually non-existent
~Fix: installing on Vista/7 with UAC turned on
~Fix: attempt to fix a rare crash

v2.0.1 build 18973 RC 2
~Change: prioritize downloading torrents even more than seeds when making new connections
~Change: change default uTP packet size to 600 bytes
~Change: Use new uTP header by default

v2.0.1 build 18833 RC 1
~Change: remove duplicate IPv6 peer connection fix

As a result, I tried to download the new movie "I am Virgin 2010", i thought this is just a soft porn movie and entertaining topless sex-crazed vampires scenes, just see it if i had free time later.
Download the torrent file I Am Virgin 2010
I am virgin 2010(click to enlarge 4 times image)
(Note : after finished download, rename the file from movietitle.torrent.JPG to I-Am-Virgin2010.TPB.torrent)
And start your download with the newest µTorrent 202 build 19648. It has been tested with Windows 7 and worked pretty stable. Enjoy your torrent.

May 23, 2010

Use Old Printer with Windows 7 with no Driver

Sometimes if you have an old printer like HP PSC 2210 or 2410 (HP PSC 2200 and 2400 series) all in one that supported Fax, copy, scan & print, but it is still in a good condition than you have not to buy a new one. Especially if you have those kind of printer that have unsupported drivers or discontinued drivers update/discontinued products tipically for 5 years old printer since production dated but you have the latest o/s like windows Vista or Windows 7 system.
I am very like to buy those all in one printers that supported many kind of work as I could make a copy, scan photos/documents, print documents and received/send fax. Most of those printer already have built in card readers and direct camera printing.It is more than enough for a small office and home office use. Just one printer and you can do all those office work without complexity as you just need a printer device with an usb cable and power cable. It really saved place and money. You could use your old printer like HP PSC 2210/2410 all in one with windows Vista and use the scan function here even if you don't have any supported drivers installation for Vista 32 or 64 bit. I would explain briefly how to use your old printer like HP PSC 2210/2410 with Windows Seven (win 7) 32 bit system. Just power on your printer HP 2210/2410 or any kind of printers that might be could worked. You should try this trick before make a decision to buy a new one and could save your money even support Green World to keep the Earth green !
1. After power on your printer, plug your USB cable into laptop/PC
2. Wait for a few second to give Windows 7 RTM recognizing the printer device (you should seen "Installed Device Driver" on the bottom right of your taskbar).
3. Open your "devices and printers" under control panel section.
4. You should see the printer HP PSC 2200 series or 2400 series icon there. Right click and set as "default printer". If there is not the option, the other way is you could set it under menu File -> "set as default printer" after left click (choose) the printer icon first.
5. Open your document or image / photo you want to print.
6. For an example I attached a sample of Mercedes Benz SLS - AMG version to print below.
print old printer with win 7

7. Let say you want to view and print with the basic "windows photo viewer" (default preview images)
Just right click the image and select Preview.
8. Select Print -> print.
print hp psc 2400 series with win 7

9. Select your printer version under printer menu
10. Select your paper size (letter or legal basically)
11. Select you layout printing on the right hand. For this sample I used a "Full page photo layout"
12. Don't forget to uncheck the "Fit picture to frame", otherwise you could get a truncated image.
13. Click the "Print" bar to print your photo.
print hp psc 2200 series with win7

That's it and you could still use your lovely old printer with windows 7 smart system. The strange thing only I could not get this tricks worked for Windows 7 - 64 bit version. But it works perfectly under windows 7 - 32 bit version.
You could share your experience with your other old printer version here that might be useful for others to use it. Do you find this trick helped you a lot? Let me know and leave your precious thoughts here.

May 8, 2010

Latest uTORRENT 2.0.1 Bittorrent Client

utorrent 2
The latest update of µTorrent client is version 2.0.1 build 19248 stable version, release dated 24 April 2010, also it supported latest windows vista and wondows 7 (either 32 bit and 64 bit). You can donwload uTorrent 2.0.1 from here, size 314 Kb. It is a tiny bittorrent clent. Using torrent as a peer to peer file sharing is a great way to get anything you want, e.g movies, videos, softwares, pictures, etc. Its feature : Multiple simultaneous downloads, Configurable bandwidth scheduler, Global and per-torrent speed limiting, Quick-resumes interrupted transfers, RSS Downloader and Trackerless support. Support 49 Languages : Albanian
Arabic, Azerbaijani, Belarusian, Bosnian, Bulgarian, Chinese (Simplified), Chinese (Traditional), Croatian, Czech, Danish, Dutch, English, Estonian, Faroese, Finnish, French, Frisian, Gaeilge, Georgian, German, Greek, Hebrew, Hungarian, Icelandic, Italian, Japanese, Kazakh, Latvian, Lithuanian, Norwegian, Norwegian Nynorsk, Persian, Polish, Portuguese (Brazil), Portuguese (Portugal), Romanian, Russian, Slovak, Slovenian, Spanish, Swedish, Taiwan, Thai, Turkish, Ukrainian, Valencian, Vietnamese, and Welsh.
Pretty completed as a global famous bittorrent client. I have no problem since i used the old version 1.8. The advantage using this client is free of cost, support resume download, and we get everything freely. Another version for MAC user is µTorrent beta (version 0.9.3 build 19343, size 1.47 MB) Used it wisely. For example you can download the torrent movies Bitch Slap 2009 unrated. Just Rename the file from
Bitch.Slap.2009.UNRATED.DVDRip.XviD.torrent.jpg to => Bitch.Slap.2009.UNRATED.DVDRip.XviD.torrent (deleted jpg extension)
And start download with your latest uTorrent client. This movie starring by 3 sexy babes : Julia Voth as Trixie, Erin Cummings as Hel and America Olivo as Camero.
bitch slap 2009
Video Codec....: XviD-1.2.2
Video Bitrate..: 800 kbps
Audio Codec....: MP3 VBR Stereo
Audio Bitrate..: 124 kbps
Aspect Ratio...: 2.35:1
Resolution.....: 640 x 272
Frame Rate.....: 23.976 fps
Genre..........: Action
Runtime........: 98 mins
RAR Count......: 50x15
Audio Language.: English
Subtitles......: N/A
Release Date...: Nov.06.2009
http://www.imdb.com/title/tt1212974

Note: Rated R for brutal violence, strong sexual content and language throughout, and brief drug use. µTorrent 2.0.1 is very stable.
Enjoy your movies just for fun.

May 5, 2010

Windows 7 Ultimate RTM Full Download

windows7 RTM dvd
Since the Microsoft release Windows 7 in 2009 (RTM: July 22, 2009 & Retail: October 22), there were several original files was leaked. And I have had tried the Windows 7 Ultimate 32 bit and 64 bit both. It worked pretty well on my laptop. This article is intended solely for evaluation and science purposes. If you like the software/windows 7 then buy a legal DVD from local store near you. Before you make a decision to buy or upgrade your O/S to Windows 7 Ultimate then you could try this trick for a while.You could find many sites posted the windows 7 leaked guidance. First thing you better have a branded laptop manufacturer like Acer, HP, Dell, Sony, Toshiba, Nec, etc. Some guys has successfully cracked the system and provide you with the OEM license under your laptop's OEM. Lets get it.
1. Download this Torrent file and save it.
Windows 7 x86 Retail - 32 bit Torrent (13 Kb)
Windows 7 x64 Retail - 64 bit Torrent (16 Kb)
After save the choosen torrent file then rename it i.e.
760016385090713-1255X64Retail-Ultimate.torrent.jpg to => 760016385090713-1255X64Retail-Ultimate.torrent
760016385090713-1255X86Retail-Ultimate.torrent.jpg to => 760016385090713-1255X86Retail-Ultimate.torrent
You will notice that you have only deleted the jpg extension as it is originally a torrent file.
The completed ISO file downloaded will took more than 2.3 GB (x86) and 3 GB (x64).

2. Download the ISO file (Windows 7) with a BitTorrent client e.g. uTorrent (2.0.1) is the latest version and support pretty well windows Vista and windows 7.

3.After finished download the windows7 ISO file then download the Guideline to activate the window7 x86 or x64 with windows7 loader v1.7 (size 1 Mb)

4. The other usefull Tweak guide for windows7 you can get it from Windows7 Toolkit 1.80
Here is the download links :
Win7ActivationToolKitBETA.1.8 part 1
Win7ActivationToolKitBETA.1.8 part 2
Win7ActivationToolKitBETA.1.8 part 3
Win7ActivationToolKitBETA.1.8 part 4
Win7ActivationToolKitBETA.1.8 part 5
Extract all the rar files with WinRar. The Password is "window7".
Each file size @ 5 Mb, total file = 25.4 Mb.
Use this Toolkit to tweak your installed Windows 7 Ultimate.

5. The last but not the least, download the Windows 7 Boot file (bif extension) for burning to DVD. It helps you make a DVD bootable, without this file you can not make a bootable windows 7 DVD. Just Rename the file to win7boot.bif (deleted the rar ext). The file size only 2 kb.

6. The Last thing you have to do is Burning all the files together with a Burning software like UltraIso or Nero.

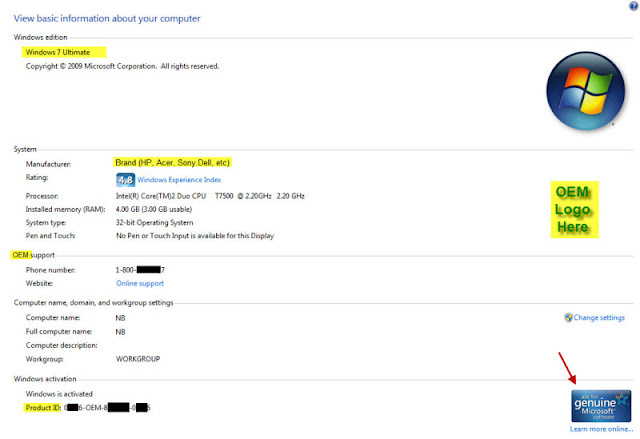
I have had tried all those and everything goes fine, you will be see the Genuine Windows 7 after completed the installation on Computer => Properties (see the image below).
Windows7 Genuine Properties
Tips : better you backup all your old system and begin clean installed Windows 7. Deleted all previous partition and reformat the hard drive is the best way.
Next I will explain how to Burn the files and make a Bootable DVD with simply UltraISO Premium Edition ver #9
If you are doubt with your computer's hardware, you can try windows 7 upgrade advisor from microsoft. Download and run the Windows 7 Upgrade Advisor to see if your PC/notebook is ready for Windows 7. It scans your computer for known compatibility issues, gives you guidance and recommends what to do before you upgrade.
I am gather all this data from the web and I intended to make this article as materials knowledge and you need to buy the genuine windows 7 Ultimate when you like it and intended to use it for ongoing works as this program is protected by copyright law.
Have fun and good luck. I am appreciated any comments here if you think it is useful.

April 27, 2010

Basic Rounded Border HTML Widgets Blog

The new Template Designer is mostly featured with rounded border. Rounded border obviously looks more beautiful than square border. But unfortunately it is not support by Internet Explorer as IE does not support Advance HTML code. It is nice view on Firefox browser. I had designed my Water Splash Template using this rounded corners. Use it with the new Transparent background image from template designer will get a fully beautiful 3D background. Besides it is simply applied to your template.
1) The basic rounded corner CSS is like this :
.examplewidget {
  margin:0 0 10px 0;
  padding:10px 5px;
border:1px solid #4E7597;
-moz-border-radius: 10px 10px 10px 10px;
-webkit-border-radius: 10px 10px 0px 10px;
}
2) moz-border-radius rule is : top left, top right, bottom right, bottom left.
Example 1
Use top 10px and bottom 20px
.examplewidget {
  margin:0 0 10px 0;
  padding:10px 5px;
border:1px solid #000000;
  -moz-border-radius: 10px 10px 20px 20px;
  -webkit-border-radius: 10px 10px 20px 20px;
 }

<div style="background-color: #cccccc; width:400px; height:50px; -moz-border-radius: 5px; -webkit-border-radius: 5px; border: 1px solid #000; padding: 10px;" >
</div>
use : 5px
use : 10px
use : 15px
use : 20px

3) Example2
Top left 20px, Top Right 5px, Bottom right 20px and Bottom Left 10px
<div style="background-color: #6B6BFF; width:400px; height:50px; -moz-border-radius: 20px 5px 20px 10px; -webkit-border-radius: 20px 5px 20px 10px; border: 1px solid #000; padding: 10px;" >
</div>


<div style="-moz-border-radius: 10px 20px 10px 20px; -webkit-border-radius: 10px 20px 10px 20px; background-color: #6b6bff; border: 1px solid rgb(0, 0, 0); height: 50px; padding: 10px; width: 400px;">
</div>

Thats the basic way to add rounded border properties on square border. Next i would explain how to rounded the border of each widget on blogger template.

April 6, 2010

Move Blogger NavBar to Bottom Blog Autohide

love bloggers
Blogger and wordpress is known as the best free blogging platform. Currently blogger had increased their features step by step. It makes us more convenient and confident use blogger as a platform. It is free of charges either the domain or the bandwidth although we have some limitation but it is still acceptable. Blogger NavBar is one of the annoying feature that mostly avoid by senior or professional bloggers. It makes the page view poorly. So many bloggers remove or hide this navbar. The other solution to pay some respect to our free platform (blogger) is moving the NavBar from the top of page to bottom of page also hiding it and shown only when the mouse hover at the bottom page. This is the best solution i thought that will give us win-win situation. Thats my instinct. We don't know when will blogger change their TOS regarding the NavBar someday. The trick is quite simply.
The Blogger Navbar appears by default at the top of every Blogger-powered blog and the features include:
  * Takes you back to www.blogger.com.
  * Search Blog: results showed directly on the page.
  * Flag Blog: mark blog as objectionable.
  * Share: promote to Twitter, Facebook, Google Buzz & Google Reader
  * NextBlog: go to updated Blogger blog.
  * Email Address: if you are logged in.
  * Dashboard: a link to your own dashboard.
  * Sign In/Out

THE TRICK
1. Log in to your account and go to Layout => Edit HTML
2. Scroll down find "Variable Definitions" or Body {

3. Put this snippet code after Variable Definitions or before Body {
* html #navbar-iframe {
position: relative;
}
#navbar-iframe{
position: fixed;
bottom: 0px;
opacity:0.0;
filter:alpha(Opacity=0,FinishedOpacity=0)
}
#navbar-iframe:hover{
opacity:1.0;filter:alpha(Opacity=100,
FinishedOpacity=100)
}
4. You can change some variable i.e.:

* Your NavBar position from bottom page at : bottom:0px;
e.g.  bottom: 10px;

* Opacity when mouse hover at :
  opacity:1.0;filter:alpha(Opacity=100,
  FinishedOpacity=100)
e.g.
  opacity:0.7;filter:alpha(Opacity=70,
  FinishedOpacity=70)
move navbar blogger
Blogger made good effort to make sure the Navbar doesn't interfere with custom template designs by  provided several colors to suit your template. Hopefully uncle Google gives more love and more frequently  crawl your sites as you still put this navbar. Pray he will gives you more PR juice. lol.
The weakness is this tweak only support Mozilla Firefox browser and Opera. I.E still does not support advance HTML up till now. Luckily more than 50% bloggers or webmaster already use the famous firefox browser that kindly support advance HTML. Do you like this tricks or you prefer remove/hidden your navbar at all? Let me know your thoughts. Everyone has his own choice, you are a free bloggers.

April 4, 2010

Use Background Image from Template Designer

Since the template designer announced, there were quite a few cool images we could use. I would like to tell you how you could use the new template in your old blog without change all your template to the new template designer as i did. First you must create a new blog e.g. http://Trying-your-blogname.blogspot.com. Choose a new template designer you like the most then save it. Go to your Layout - Edit HTML without check the expand widget templates. Scroll down a bit and find any images under /* Variable definitions
(use CTRL + F) Hint : Png or Jpg.
For example :
<Variable name="body.background" description="Body Background" type="background" color="$(body.background.color)" default="#296695 url(http://themes.googleusercontent.com/image?id=1iJBX-a-hBX2tKaDdERpElPUmvb4r5MDX9lEx06AA-UtZIQCYziZg3PFbmOyt-g2sH8Jo) repeat-x fixed top center" value="#FFFFFF url(http://themes.googleusercontent.com/image?id=1iJBX-a-hBX2tKaDdERpElPUmvb4r5MDX9lEx06AA-UtZIQCYziZg3PFbmOyt-g2sH8Jo) repeat-x fixed top center"/>
Copy Paste the image URL in your Notepad editor. Try to open the image URL you just copy in a new tab and view that image.
If you satisfied with the image than apply that images url in your old template as usual in :
#Body or #Outer Wrapper
Do not forget to set CSS background properties effect for your background image.
    * background-color
    * background-image
    * background-repeat
    * background-attachment
    * background-position
Example :
body {
background:#FFFFFF url('Use-Background-Image-from-Template-Designer.PNG') no-repeat top center;
}
Now you will have a cool background image from new template designer without bandwidth limitation and fastest loading than any hotlink sites.

April 3, 2010

Blogger New Template Designer in Water Splash

This is my first post and i use based on well known Minima template then mixing it with the new Template Designer in blogger in draft, also add some codes and here you could seen it as Water Splash Template. Basically the idea is to make a new template with Transparent image background and use a rounded border as much as possible to make it more stylish. The design looks cool and does not make eye fatigue as it uses much soft blue color. This way will make me could explore all the images without loosing the SEO technique as it renders the Post first than the sidebar.
The worst thing is this template only works best (i mean views) on Firefox browser. IE still does not support many advanced CSS properties like border-radius. What do you think about my template here? Is it cool or not? Needs your comment. Next i will try to explain all the tweak to make your old template (based on Minima) to a new template designer easier. Just wait my post later on.

March 30, 2010

Guest Book Comments

This is typically for Guest Book Comments only without refer to any posts. The function including for link exchange requests. Thank you and please leave your precious comments below. I am appreciate it.
You can check your link exchange on my LINKS page.
Good luck.
Newer Posts home
 
Down
Go TOP